Microcontrollers and hardware programming, The latest trainings
Essential Steps to Set Up Your Arduino: A Beginner’s Guide
Setting up your Arduino can be an exciting venture, especially if you’re stepping into the world of electronics and programming for the first time. Whether you’re looking to build a simple LED circuit or a more complex project, understanding the essential steps to get your Arduino up and running is crucial. This guide will walk you through everything you need to know to set up your Arduino successfully.
1. Understanding What Arduino Is
Before diving into the setup process, it’s important to grasp what Arduino actually is. At its core, Arduino is an open-source electronics platform based on easy-to-use hardware and software. It consists of a microcontroller, which is essentially a small computer that can be programmed to control various devices. The beauty of Arduino lies in its simplicity and versatility, making it an ideal choice for beginners and seasoned developers alike.
2. Gathering Your Materials
To start, you’ll need a few essential components. Here’s a checklist to ensure you have everything:
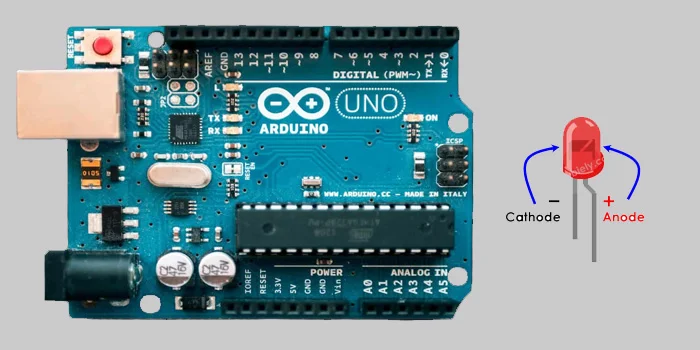
- Arduino Board: The most common options are the Arduino Uno, Nano, or Mega. For beginners, the Uno is often recommended due to its user-friendly design.
- USB Cable: This will connect your Arduino to your computer. Make sure it’s compatible with your board.
- Breadboard: Useful for prototyping circuits without soldering.
- Jumper Wires: These will help you connect components on the breadboard.
- LEDs, Resistors, and Other Components: Depending on your initial projects, you might want to gather a few basic electronic components.
- Computer: You’ll need a computer to install the Arduino IDE and write your code.
3. Installing the Arduino IDE
The Arduino Integrated Development Environment (IDE) is the software you’ll use to write and upload code to your Arduino board. Here’s how to install it:
- Download the IDE: Go to the official Arduino website and download the IDE for your operating system (Windows, macOS, or Linux).
- Install the IDE: Follow the installation instructions specific to your OS. It’s usually a straightforward process, just like installing any other software.
- Launch the IDE: Once installed, open the IDE. You’ll see a simple interface with a text editor for writing your code and a console for output.
4. Connecting Your Arduino to Your Computer
Now that you have the IDE set up, it’s time to connect your Arduino board:
- Use the USB Cable: Plug one end of the USB cable into your Arduino and the other end into your computer. You should see a power LED light up on the board, indicating it’s receiving power.
- Select the Board Type: In the Arduino IDE, go to the “Tools” menu, hover over “Board,” and select the type of Arduino you’re using (e.g., Arduino Uno).
- Select the Port: Again, in the “Tools” menu, hover over “Port” and select the port that corresponds to your Arduino. If you’re unsure, unplug the Arduino and see which port disappears, then plug it back in to identify the correct one.
5. Writing Your First Sketch
A “sketch” is the term used for a program written in the Arduino IDE. Let’s write a simple program to blink an LED, which is a classic first project:
- Open a New Sketch: In the IDE, click on “File” and then “New” to create a new sketch.
- Enter the Code: Copy and paste the following code into the text editor: void setup() { pinMode(13, OUTPUT); // Set pin 13 as an output } void loop() { digitalWrite(13, HIGH); // Turn the LED on delay(1000); // Wait for a second digitalWrite(13, LOW); // Turn the LED off delay(1000); // Wait for a second }
- Save Your Sketch: Click on “File” and then “Save.” Give your sketch a name that makes sense to you.
6. Uploading Your Sketch to the Arduino
With your code written, it’s time to upload it to your Arduino:
- Click the Upload Button: It looks like a right arrow in the top left corner of the IDE. This will compile your code and upload it to the board.
- Watch for Errors: If there are any errors in your code, they’ll show up in the console at the bottom of the IDE. If everything is correct, you should see a “Done uploading” message.
7. Observing Your First Project
If everything went smoothly, your LED connected to pin 13 should now be blinking on and off every second. Congratulations! You’ve just completed your first Arduino project.
8. Expanding Your Knowledge
Now that you’ve successfully set up your Arduino and run a basic program, you might be wondering where to go from here. Here are a few suggestions:
- Explore Example Sketches: The Arduino IDE comes with a variety of example sketches that demonstrate different functionalities. You can find them under “File” > “Examples.” These are great for learning and experimenting.
- Learn About Sensors and Actuators: Start incorporating sensors (like temperature or motion sensors) and actuators (like motors) into your projects. This will broaden your understanding of how Arduino can interact with the physical world.
- Join the Community: The Arduino community is vast and welcoming. Forums, online groups, and local meetups can provide support, inspiration, and collaboration opportunities.
9. Troubleshooting Common Issues
As you dive deeper into your Arduino journey, you might encounter some common issues. Here are a few tips for troubleshooting:
- Board Not Recognized: If your computer doesn’t recognize the Arduino, try a different USB cable or port. Ensure that the drivers are installed correctly.
- Upload Errors: If you get errors while uploading, double-check that you’ve selected the correct board and port in the IDE.
- Code Doesn’t Work: If your code isn’t functioning as expected, go through it line by line. Use the Serial Monitor (found under “Tools”) to debug and see output from your code.
10. Keeping Safety in Mind
While working with electronics, safety should always be a priority. Here are some quick safety tips:
- Work in a Well-Ventilated Area: If you’re soldering or using components that generate heat, ensure good airflow.
- Avoid Short Circuits: Double-check your connections before powering up your circuit to prevent short circuits that could damage your components.
- Handle Components with Care: Some components can be sensitive to static electricity. Use an anti-static wrist strap if you have one.
11. Exploring Advanced Projects
Once you feel comfortable with the basics, you might want to tackle more advanced projects. Here are a few ideas to inspire you:
- Home Automation: Use Arduino to control lights, fans, or appliances remotely.
- Robotics: Build a simple robot that can navigate using sensors.
- Weather Station: Create a station that measures temperature, humidity, and other weather-related data.
12. Resources for Continued Learning
There’s a wealth of resources available for those eager to learn more about Arduino. Here are some to consider:
- Books: Titles like “Arduino Cookbook” or “Getting Started with Arduino” are excellent for beginners.
- Online Courses: Websites like Coursera, Udemy, or even YouTube have numerous courses ranging from beginner to advanced levels.
- Documentation: The official Arduino website has extensive documentation and tutorials that cover a wide range of topics.
Code example
void setup() {
pinMode(13, OUTPUT); // Set pin 13 as output
}
void loop() {
digitalWrite(13, HIGH); // Turn LED on
delay(1000); // Wait 1 second
digitalWrite(13, LOW); // Turn LED off
delay(1000); // Wait 1 second
}
Conclusion
Setting up your Arduino is just the beginning of an exciting journey into the world of electronics and programming. By following these essential steps, you’ve laid a solid foundation for future projects. Remember, the key to mastering Arduino is experimentation and persistence. Don’t be afraid to make mistakes; they’re often the best teachers. As you continue to explore and create, you’ll find that the possibilities are virtually endless. Happy tinkering!
Join our newsletter to get the latest projects, tutorials, and tech updates straight to your inbox! 🚀

