
Internet of Things, The latest trainings
ESP8266 IoT Web Control with HTML & CSS (Relay Project)
Feb
In modern IoT projects, creating a web-based control panel is one of the most practical and powerful skills you can learn. If you’re working with the ESP8266, building a simple HTML and CSS web page allows you to control relays, lights, motors, and other electronic devices remotely through a browser.
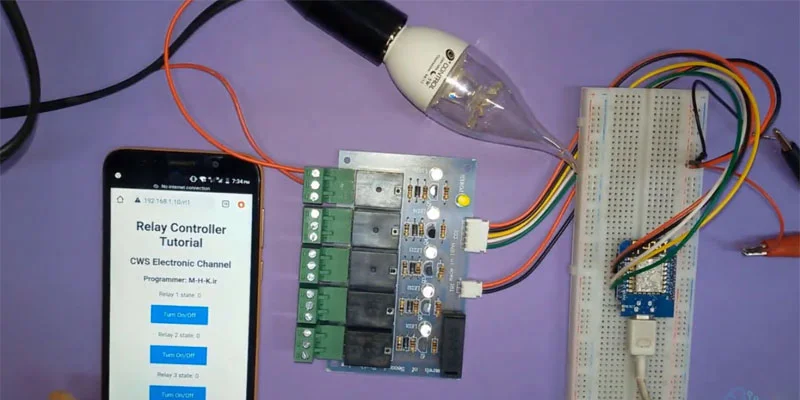
In this guide, you’ll learn how to design a clean and functional IoT web interface to control a 5-channel relay module connected to the ESP8266. This method is ideal for smart home systems, automation projects, and electronics prototypes.
You can follow the full step-by-step tutorial in the video below while reading this article
Why Use ESP8266 for IoT Web Control?
The ESP8266 microcontroller has built-in WiFi capability, making it perfect for hosting a lightweight web server. Instead of building a complex mobile app, you can create a simple web dashboard using HTML and CSS.
Advantages include:
-
Low cost and widely available hardware
-
Built-in WiFi support
-
Easy integration with Arduino IDE
-
Fast deployment for smart home automation
-
Remote control through any browser
By combining ESP8266 web server programming with basic HTML CSS design, you create a powerful yet simple IoT control system.
Step 1: Understanding the IoT Web Server Concept
When the ESP8266 connects to your WiFi network, it can host a small web server. When a user enters the device’s IP address in a browser, the ESP8266 sends an HTML page.
That page contains:
-
Buttons (ON/OFF)
-
Status indicators
-
Basic CSS styling
-
HTTP request triggers
Each button sends a specific request (for example: /relay1/on). The ESP8266 reads the request and activates the correct relay pin.
This structure is the foundation of IoT device control via web browser.
Step 2: Designing the HTML Control Panel
Your HTML structure can be simple but organized:
-
A clear title (IoT Control Panel)
-
Five control buttons for 5-channel relay
-
Clean layout using CSS
-
Responsive design for mobile use
Example structure:
-
Header section
-
Relay control grid
-
Status section
Using proper <div> containers and CSS styling improves readability and usability. Keep the interface minimal and intuitive.
Step 3: Styling with CSS for a Professional Look
A good IoT web interface should be:
-
Clean
-
Easy to read
-
Mobile-friendly
-
Fast loading
Use:
-
Background colors
-
Rounded buttons
-
Hover effects
-
Grid or flexbox layout
-
Clear ON (green) / OFF (red) states
This improves user experience and makes your smart home dashboard look professional.
Step 4: Connecting HTML Buttons to ESP8266 GPIO

Each relay is connected to a GPIO pin of the ESP8266. When a user clicks a button:
-
Browser sends HTTP request
-
ESP8266 reads URL
-
GPIO pin changes state
-
Relay switches ON or OFF
This allows real-time control of:
-
Lights
-
Fans
-
Water pumps
-
Home appliances
-
Industrial automation modules
Applications in Smart Automation
This type of ESP8266 IoT web control project is perfect for:
-
Smart home systems
-
Greenhouse automation
-
Remote relay switching
-
Industrial IoT prototypes
-
Educational electronics projects
Since you’re already working with ESP8266 in automation projects, this approach integrates perfectly into smart agriculture, hydroponic control systems, or IoT monitoring dashboards.
Final Thoughts
Designing a web page to control IoT devices using HTML and CSS with ESP8266 is one of the most practical skills in modern electronics. It combines:
-
Web development
-
Embedded systems
-
IoT communication
-
Smart automation
With just a simple web server and structured HTML, you can build a scalable and customizable IoT control panel for any project.
Start simple, improve the design step by step, and soon you’ll have a fully functional smart control dashboard running directly on your ESP8266.
You’ve reached the end of this article.
We’ve continued the tutorial in another article and video — click here to go to the next part.